|
Software: Ulead PhotoImpact XL Gif Animator 5 |
Title: Animated Christmas Ornament Sig Tag |
| Author: Carol (Miniviolet) |
Skill Level: Intermediate |
| Terms of Use: You may not re-distribute or post this tutorial as your own. However, what you create with this tutorial is yours to do with as you please. A link back to this tutorial is appreciated but is not required. The tutorial itself along with the images herein are copyrighted to me and all rights are reserved. |
©Carol (Miniviolet) |
|
Additional files: Diana's PSP Tubes - Christmas Ornaments (the second set of ornaments) Xero Sparkles Filter (click on downloads, then choose sparkles) |
|
| Description: Animated Signiture Tags are fun to add to your emails and e-group posts. During the holidays they are especially fun to make! This tutorial assumes you are familiar with importing PSP tubes into your stamp collection, and how to install and use filters. It also assumes a basic knowledge of GA5 (gif animator 5). |
|
| 1. Open a new canvas, white, 250x150 pixels | |
| 2. Click on the text tool and type the name you want for your sig tag. Choose a font that is thick. I used a font named "ALIBI". Choose mode 3D, border 4, depth -30. For this font I used a size of 70. Center your text. | 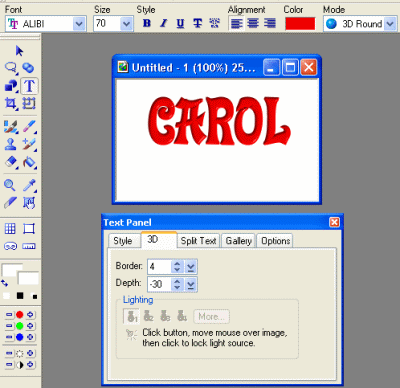 |
| 3. Choose the different Christmas ornament stamps one at a time and arrange on your name. You want them to be of varying sizes, between 15 to 25. You can resize with the transform tool later if you think some are too small or too big. | 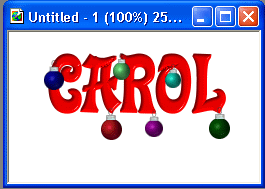 |
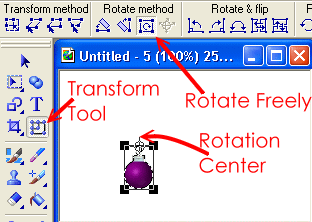
| 4. Select the first ornament. Click on transform tool, rotate freely. Pick
the first Christmas ornament and move the rotation center up to the ornament hanger. |
 |
| 5. Rotate the ornament slightly to one side. The ornaments will be swinging back and forth in the animation, this is the height the swing will start at. Repeat steps 4 and 5 for each ornament. | 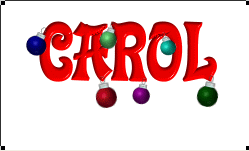 |
| 6. Select your text. In the easy palette select
"particle gallery", "snow". Select snow 6, right
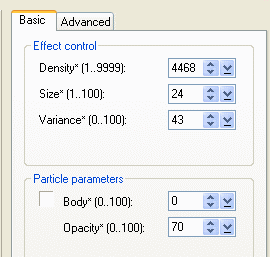
click, modify properties and apply. Change body to "0" and opacity to "70" as shown. Click OK and apply to image. |
 |
| 7. "Save as" using a name denoting that it is the first frame for your animation. I used "carolsig1". Save as a gif. | |
| 8. DO NOT CLOSE THIS IMAGE!! Undo back to remove the snow. | |
| 9. Using the rotate freely tool again, re-arrange each Christmas ornament slightly, bringing them to a more upright position. It will look like the image in step 3 again. | |
| 10. Apply snow to text again using the same settings, this time clicking random until you achieve a new snow pattern you are happy with. Save as carolsig2.gif |
|
| 11. Undo once more to remove snow. Re-arrange balls again to complete the swing in opposite direction from first image. Apply snow to text once more, again using the random button to achieve a new pattern. Save as carolsig3.gif | |
| 12. Open gif animator. Use animation wizard and select canvas size of 250x150. Select add images and choose your gif images you saved from PI. Arrange the images in order and follow the rest of the prompts using the defaults. | |
| 13. Duplicate frame 2 and move the duplicate to the last frame. Save your animation as a gif file or use the optimization wizard to optimize the image before saving. | 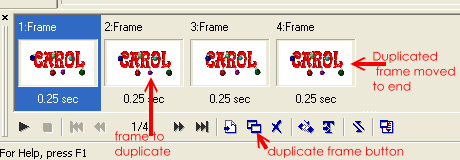 |
| You now have a fun and festive animated sig tag! But wait...there's more! Here are some other fun twists you can use on this sig tag. This one uses a fun sparkle in the ornaments. |
|
| 1. Follow steps 1 through 5 above. After arranging the ornaments with your desired rotation for the first image, select all ornaments and add the sparkle effect from the Xero Sparkles Filter. Use the settings shown here. Make sure the main color is changed to white and use highlights is not selected. I used the sparkle style of "Cross_1". | 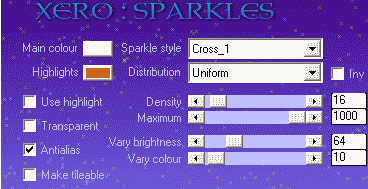 |
| 2. Save as sig1.gif. Undo the sparkle effects and re-arrange the ornaments as in the above
steps 8 and 9. Re-apply the sparkles changing density and maximum settings slightly to give a different distribution and save as sig2.gif. Undo sparkle effects and re-arrange ornaments for final setting and apply sparkle effects again. Animate as in above
steps 12 and 13. |
|
| But wait! There's even MORE! Try this one with blinking stars. |
|
| 1. Follow steps 1 through 5 above. After
arranging the ornaments with your desired rotation for the first image,
select your text. Next, click on your stamp tool.
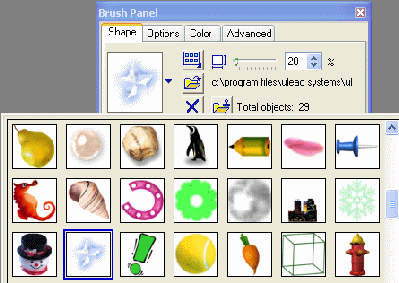
Choose "stars" stamp as shown. In the stamps toolbar make sure "separate objects" is selected. A scale of 20 and spacing of 45 works nicely for this image. |
|
| 2. While holding down the Shift key, press "P" to paint on edges. Now, I don't like the moons in this stamp set, so select each moon that appeared and delete it. Save as your sig1.gif. Undo back to the ornament placement and re-arrange as in 8 and 9 above. Re-apply the star stamp, this time changing the spacing by 1 to get a different layout of the stamp. Save as sig2.gif. Undo again and re-arrange ornaments for last time, and add star stamp again changing the spacing by 1. Animate as in 12 and 13 above. | |
|
Let's see what other variations you can come up with! Have fun! Questions? email me ©Carol (Miniviolet) 2004 |
|